Is your Surface Pro experiencing difficulties connecting to Wi-Fi? Don’t worry; you’re not alone. Many Surface Pro users encounter issues and made threads on the Microsoft Community Forums that their Surface pro not Connecting to Wi-Fi.
A reliable internet connection is essential for seamless browsing, downloading, and online activities. In this article, we will explore various troubleshooting steps to help you resolve the issue and get your Surface Pro back online.
Read About> How to Fix Surface Pro Not Charging Issue
Check Wi-Fi Settings
When your Surface Pro not connecting to Wi-Fi, the first step is to ensure that the Wi-Fi settings are correctly configured.
Verify Wi-Fi is turned on
To start, check if Wi-Fi is enabled on your Surface Pro. You can do this by following these steps:
- Click on the Wi-Fi icon in the system tray at the bottom-right corner of the screen.
- Ensure the Wi-Fi toggle switch is in the “On” position. If it’s off, click on it to turn it on.
Check if Airplane mode is disabled
Another factor that can prevent your Surface Pro from connecting to Wi-Fi is the Airplane mode. When Airplane mode is enabled, it disables all wireless connections, including Wi-Fi. Follow these steps to disable Airplane mode:
- Open the Action Center by clicking on the speech bubble icon in the system tray or by pressing the Windows key + A.
- If Airplane mode is enabled, click on the Airplane mode button to disable it.
Restart Your Surface Pro and Router
Sometimes, a simple restart can resolve connectivity issues. Begin by restarting your Surface Pro and your wireless router. Follow these steps:
- Shut down your Surface Pro by clicking on the Start button, selecting the Power icon, and choosing Shut down.
- Unplug the power cable from your wireless router.
- Wait for 10 seconds and then plug the power cable back into the router.
- Power on your Surface Pro and wait for it to boot up.
- Once your Surface Pro is back on, try connecting to the Wi-Fi network again.
Forget and Reconnect to the Wi-Fi Network
If the previous steps didn’t work, try forgetting the Wi-Fi network and reconnecting to it. Here’s how:
- Click on the Wi-Fi icon in the system tray.
- Select “Network & Internet settings.”
- In the Settings app, click on “Wi-Fi” in the left sidebar.
- Under the “Manage known networks” section, select the Wi-Fi network you’re having trouble with.
- Click on “Forget.”
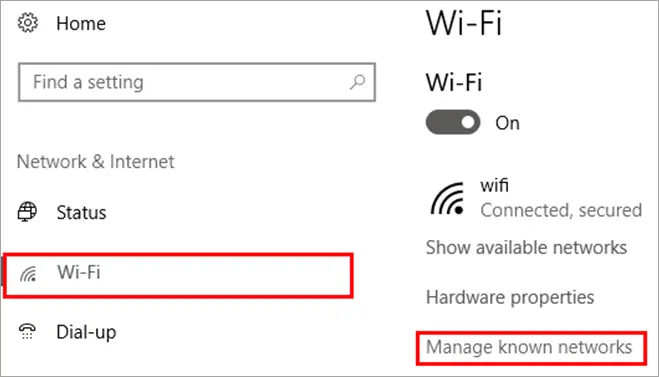
Once you’ve forgotten the Wi-Fi network, proceed to reconnect to it by following these steps:
- Click on the Wi-Fi icon in the system tray.
- Select the Wi-Fi network you want to connect to from the available networks list.
- If the network is secured, enter the password when prompted.
- Click on “Connect” to establish the connection.
Update Network Drivers
Outdated or incompatible network drivers can cause connectivity issues on your Surface Pro. Updating the network drivers can often resolve these problems. There are two methods to update the network drivers: using Device Manager and manual update.
Use Device Manager to update network drivers
To update drivers using Device Manager
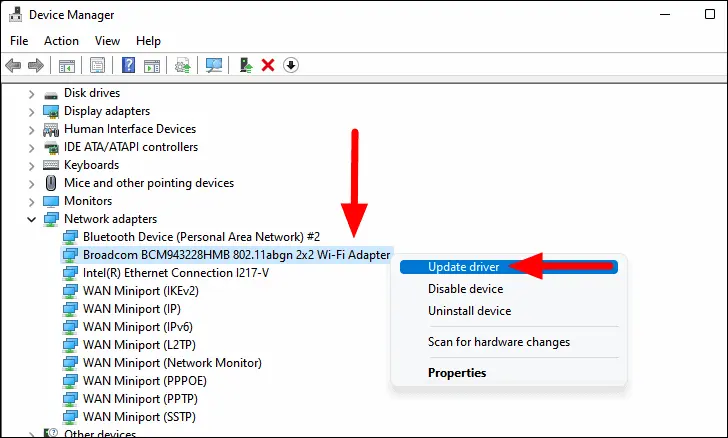
- Right-click on the Start button and select “Device Manager” from the context menu.
- In the Device Manager window, expand the “Network adapters” category.
- Right-click on the network adapter that corresponds to your Wi-Fi connection and select “Update driver.“
- Choose the option to search automatically for updated driver software.
- Follow the prompts to complete the driver update process.
Manually update network drivers
To manually update the network drivers, follow these steps:
- Open your preferred web browser and navigate to the manufacturer’s website.
- Look for the “Support” or “Drivers” section.
- Enter the model number of your Surface Pro and search for the latest network drivers compatible with your device.
- Download the updated drivers and save them to a location on your Surface Pro.
- Once downloaded, double-click on the driver file and follow the on-screen instructions to install the updated drivers.
Reset Network Settings
Resetting the network settings on your Surface Pro can help resolve complex connectivity issues. This process will remove all saved Wi-Fi networks and their passwords, so make sure you have them available before proceeding. To reset the network settings, follow these steps:
- Open the Start menu and select “Settings.“
- In the Settings app, click on “Network & Internet.“
- Scroll down and click on “Network reset.“
- A warning message will appear, explaining that this action will remove all network adapters, settings, and virtual switches. Click on “Reset now” to continue.
- Wait for the reset process to complete and then restart your Surface Pro.
Disable Power Saving Mode for Wi-Fi Adapter
Power-saving settings can sometimes interfere with the Wi-Fi connection on your Surface Pro. Disabling power-saving mode for the Wi-Fi adapter can potentially resolve this issue. Here’s how:
- Right-click on the Start button and select “Device Manager.”
- In the Device Manager window, expand the “Network adapters” category.
- Right-click on the Wi-Fi adapter and select “Properties.”
- Go to the “Power Management” tab.
- Uncheck the box that says “Allow the computer to turn off this device to save power.”
- Click on “OK” to save the changes.
Run Network Troubleshooter
Windows provides a built-in Network Troubleshooter that can automatically detect and fix common network-related problems. Running this troubleshooter may help resolve the Wi-Fi connectivity issue. Follow these steps:
- Right-click on the Start button and select “Settings.“
- In the Settings app, click on “Network & Internet.“
- In the left sidebar, click on “Status.”
- Scroll down and click on “Network troubleshooter.“
- Follow the prompts provided by the troubleshooter to diagnose and fix any network issues detected.
Disable IPv6
Disabling IPv6 can sometimes resolve Wi-Fi connectivity problems on your Surface Pro. Here’s how you can do it:
- Right-click on the Start button and select “Network Connections” from the menu.
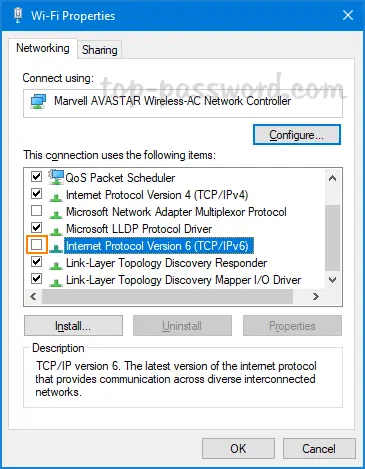
- In the Network Connections window, find your Wi-Fi adapter, right-click on it, and select “Properties.“
- Scroll down and locate “Internet Protocol Version 6 (TCP/IPv6)” in the list.
- Uncheck the box next to “Internet Protocol Version 6 (TCP/IPv6)” to disable it.
- Click on “OK” to save the changes.
Check Firewall Settings
Firewall settings can sometimes block the Wi-Fi connection on your Surface Pro. Ensure that the firewall settings allow access to the necessary network services. Here’s how you can check and modify your firewall settings:
- Click on the Start button and search for “Windows Security” or “Windows Defender Firewall.”
- Open the Windows Security app or Windows Defender Firewall.
- Click on “Allow an app or feature through Windows Defender Firewall” or a similar option.
- Ensure that “Wi-Fi” and other relevant network-related apps or services are allowed through the firewall.
- If necessary, click on “Change settings” and enable the checkboxes for the required apps or services.
- Click on “OK” to save the changes.
Reset your Surface Pro
If all else fails, resetting your Surface Pro to its factory settings can often resolve persistent Wi-Fi connectivity issues. However, note that resetting your device will erase all personal files and applications, so make sure to back up your data before proceeding. To reset your Surface Pro, follow these steps:
- Click on the Start button and select “Settings.”
- In the Settings app, click on “Update & Security.”
- Go to the “Recovery” tab.
- Under the “Reset this PC” section, click on “Get started.”
- Choose either the “Keep my files” or “Remove everything” option, depending on your preference.
- Follow the on-screen instructions to initiate the reset process.
Contact Microsoft Support about Your Surface Pro Not Connecting to Wi-Fi
If you have tried all the troubleshooting steps mentioned above and your Surface Pro still cannot connect to Wi-Fi, it is recommended to seek assistance from Microsoft Support. They have dedicated support channels to help users with Surface-related issues. You can visit the Microsoft Support website or contact their support team directly for further assistance.
Also Read About
FAQs
Conclusion
We hope this article has provided you with helpful solutions to fix whenever you see your surface pro not connecting to Wi-Fi. You should be now able to resolve the most common problems by yourself. Remember to check your Wi-Fi settings, restart your device and router, update network drivers, reset network settings, disable power-saving mode, run the network troubleshooter, check firewall settings, and reach out to Microsoft Support if needed.

Mia Darren is a well-known name in the world of technology journalism, serving as the co-founder of the popular website Technob. With a passion for all things tech-related, Mia has been writing about the latest gadgets, software, and digital trends for over a decade.
Her articles are widely recognized for their insightful analysis, engaging writing style, and commitment to providing readers with accurate, up-to-date information. Mia’s expertise in the tech field has earned her a reputation as one of the industry’s most respected voices, with many turning to her for guidance and advice on a wide range of topics.
Her dedication to the field and her commitment to helping others understand the complexities of modern technology have made her a beloved figure among her colleagues and fans alike.
Whether she’s writing about the latest smartphone release or offering tips on how to stay safe online, Mia’s work is always informative, engaging, and accessible. Her contributions to the world of tech journalism have helped shape the way we think about and interact with technology, and her influence is sure to be felt for years to come.

